
Ubuntu: printer instellen - hoe het werkt
Deze praktische tip laat zien hoe u uw printer instelt onder Ubuntu. De gebruiksvriendelijke Linux-versie installeert automatisch de meeste printerstuurprogramma's zodra u verbinding hebt met internet. We leggen uit hoe u een printer kunt toevoegen, verwijderen en beheren.
Linux: printers instellen op Ubuntu
Standaard herkent het Ubuntu-besturingssysteem uw printer. U stelt het in met behulp van de volgende stappen.
- Verbind de printer via USB met uw apparaat en start de printer.
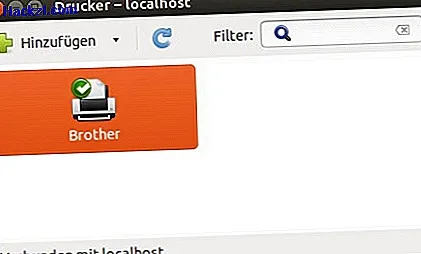
- Open de systeeminstellingen en navigeer in het gedeelte "Hardware" naar het menu-item "Printers".
- Kies "Toevoegen".
- Onder "Apparaten" vindt u nu de exacte naam van uw printer.
- Tik op "Volgende".
- Bepaal de juiste stuurprogramma's uit de database. Als de juiste stuurprogramma's er niet in staan, download ze dan van de website van de fabrikant en selecteer "Verstrek PPD-bestand" in plaats van "Selecteer stuurprogramma uit database".
- U kunt vervolgens de printernaam en beschrijving in Ubuntu wijzigen.
- Bevestig met "Toepassen".
- Selecteer indien nodig "Testpagina afdrukken".
Ubuntu: printers instellen en aanpassen
U hebt nu uw printer geïnstalleerd.
- In de systeeminstellingen vindt u uw apparaat onder "Printer".
- Als u de printer wilt verwijderen, klikt u met de rechtermuisknop op de naam en selecteert u "Verwijderen".
- U opent de printereigenschappen door met de rechtermuisknop op de naam te klikken en vervolgens "Eigenschappen" te selecteren.
- In het menu dat nu wordt geopend, kunt u de printerstatus en de afdrukwachtrij bekijken, de printer vrijgeven en de papierinvoer regelen.

Muziekvideo: Linux maakt je vrij
De instructies beschrijven een oplossing onder Ubuntu 14.04 LTS. Een ander artikel zal u vertellen hoe u Windows-stuurprogramma's op Ubuntu kunt gebruiken.